
“Your products and customer service are exceptional. You backed your product 30 years after I purchased it... How many companies today would do that? You're the best, Symmons. Please never change!””
Happy Customer
Support
Skip to:
Help Line
Call 1 (800) SYMMONS
Customer Service Help is available Monday - Friday 7:30AM to 6:00PM EST
FAQs
What is ReadyStock™?
ReadyStock is one of the three stocking categories in the Symmons Stocking Program: ReadyStock, Standard Product, and Special Order.
ReadyStock items are always in stock, and they ship within three days, regardless of quantity, guaranteed.
All ReadyStock items are indicated with a ReadyStock icon:
![]()
To find all ReadyStock products, just check the ReadyStock filter option on the Search page:

ReadyStock always has thousands of our most popular products in stock and ready to go!
What is Standard Product?
Standard Product is defined as product that’s regularly in stock, and will ship in three days. It’s recommended that customers call for availability of large orders of 10 items or more.
The Standard Product stocking category includes a wide variety of showers, faucets, valves, parts, and accessories.
What is Special Order?
Special Order products are generally unique or low-volume products that are built to order for projects with extended lead times of 18 weeks or more. Minimum order quantities may apply.
If you need customized products, our Design Studio™ team can make your ideas a reality.
What's the best way to keep my Symmons product clean?
All Symmons product finishes are deep and durable, but routine care and cleaning steps are important for these products to retain their luster and long life.
Always use a simple solution of mild soap and water to clean your Symmons product.
Never use abrasive scrubbing sponges, all-purpose cleaners, or harsh bathroom cleaning chemicals on product finishes.
Is it OK to use organic home cleaning methods like vinegar on my Symmons faucet?
While home solutions like vinegar, lemon juice, or baking soda may seem like safe alternatives, many are naturally acidic and can discolor or damage the finish.
Symmons recommends using just a mixture of mild soap and water on a soft cloth to clean surfaces of fingerprints, dirt, and water stains, and then wipe dry with a dry cloth or microfiber towel.
This safe, simple method will keep your Symmons products looking like new for decades!
I've seen some "magic" sponges advertised that can be used for all sorts of cleaning projects, can I use them on my Symmons product?
Those so-called “magic” sponges are actually coated with a very fine abrasive grit, which will scratch and remove the protective coatings on any surface, not just Symmons products.
Abrasive cleaning sponges, chemical-heavy polishes, or harsh solvents may permanently damage the finish and will void the warranty.
The best method is routine cleaning with warm soap and water on a soft cloth, followed by wiping with a clean, soft microfiber towel.
My Temptrol® shower valve started dripping, can it be repaired?
Yes, easily! Simply replace the hot and cold washer parts using a genuine Symmons TA-9 Washer Repair Kit. It has everything you’ll need, including installation instructions.
Two Important Points!
First, don’t forget to shut off the hot and cold water supply!
Second, turn the handle on the Temptrol valve counterclockwise until it’s in the FULLY OPEN position before disassembly! Attempting to disassemble the valve in the close position will do irreparable damage to the valve.
Read the Installation Instructions carefully before you begin.
Why isn't my shower or tub water hot enough when the faucet in the same bathroom provides plenty of hot water?
OK… grab a seat, this explanation may take a bit! Buckle up!
Seasonal Ground Water Temperatures
This situation typically arises during the colder (winter) months in northern climates, when the incoming cold water temperature drops due to the colder ground temperatures. In most cases, the issue is unrelated to the shower valve and most likely the result of a tankless (on-demand) water heater. Tankless water heating systems are capable of producing a fixed amount of hot water per minute based on certain incoming cold water temperatures.
To provide a comfortable shower or tub/shower temperature during the colder winter months, a larger ratio of hot water is needed to compensate for the lower cold water temperature being mixed in the valve.
Also, depending on the area, a tankless water heater must quickly raise the cold water temperature from as low as 40°F up to 120°F in the winter months, whereas in the warmer (summer) months the cold water temperature may be as warm as 65°F. This increase in demand for hot water typically outstrips the ability of the water heater to produce enough hot water, resulting in a lukewarm shower or tub temperature.
Flow Restrictors
The reason that the bathroom faucet appears to provide adequate hot water is because the faucet contains an aerator that restricts the amount of water that flows between 0.5 gallons and 1.5 gallons per minute. In contrast, the Temptrol® valve will produce 5 to 7 gallons per minute from the tub spout and 2.0 gallons per minute if equipped with a newer flow-restricted showerhead. The flow restrictor in the faucet reduces the flow significantly, giving the tankless water heater time to heat the passing water.
Confirm Your Water Temperature and Volume
You can conduct a test to see if the overall temperature of your hot water decreases during continuous use. First, turn on the hot water in your bathroom faucet and take a temperature reading with a thermometer. Then, while leaving the faucet running, open your Temptrol valve fully to the hottest position. Let both run for five minutes and monitor the temperature in both. You’ll notice that the temperatures may start out quite different; this is due to the Temptrol valve always mixing cold with the hot water first. But over time, you’ll observe that the hot water coming from both outlets will start to decline in temperature due to the condition described above.
Reduced Flow Temptrol Spindle
The best solution we can offer to help offset this water heater deficiency is to suggest a Temptrol Limited Flow Spindle (Part #TA-10-3HL), which cuts down the flow of water from the valve. This reduction in flow may help with the symptoms of the problem, but it will not correct the underlying cause of insufficient hot water being produced by the tankless water heater.
Why can I get only all hot or all cold water out of my Temptrol® shower valve?
This situation can occur if the pressure-balancing piston housed inside the TA-10® spindle is prevented from moving freely, usually by debris like calcium buildup or sand.
Sometimes you can free the piston without disassembly by following these steps:
1. Remove the valve handle. It will be held onto the spindle by a hex head screw or a Phillips-head screw.
2. Place the handle back on the spindle temporarily and use it to open the valve to the halfway position.
3. Remove the handle and firmly tap end of TA-10 spindle with a rubber or wooden mallet; DO NOT use a metal hammer.
4. Test the water temperature with a thermometer, then reassemble the handle when you’re done.
If the issue persists, shut off the water supplies and refer to the FAQ “How do I disassemble my Temptrol valve so I can rebuild it?” to remove the TA-10 spindle assembly from valve.
After removal, tap the handle end of the spindle against a solid object to free the piston. Shake the spindle to check if the piston is moving freely; you should hear a telltale “clicking” sound as the piston slides back and forth.
If the issue is caused by calcium buildup, you can soak the entire piston assembly in household white vinegar to break down the calcium and free the piston. If these steps do not resolve the issue, install a new genuine TA-10 spindle.
The hot water from my shower is only lukewarm and someone said it may be the "Temperature Limit Stop." What is that and how do I adjust it?
All Symmons pressure-balancing shower valves are equipped with a Temperature Limit Stop to set the maximum outlet temperature. This feature is used to limit the maximum hot water temperature for safety reasons where/when required by the plumbing code.
If you’re not having a problem with hot water elsewhere in the house, it’s possible that the limit stop feature has been set too low, or the incoming hot water temperatures have changed, requiring an adjustment of the limit stop. It’s not necessary to turn off the water to set or adjust the Temperature Limit Stop.
CAUTION: DO NOT FULLY REMOVE the Temperature Limit Stop screw!
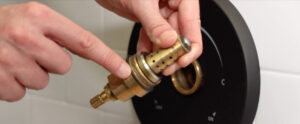
1. To adjust the Temperature Limit Stop, remove the shower handle from the TA-10® spindle, either by loosening the hex head set screw, or on older models, by removing center screw that holds the handle onto the spindle.
2. Remove the round dome cover by turning in a counterclockwise direction. Underneath, you’ll see the Temperature Limit Stop (T-34), which is a small brass slotted screw head that’s visible in the side of the Cap Assembly (Part #T-12A).
![]()
3. Place the handle back on the spindle (loosely) and turn the valve on until the preferred maximum temperature is reached. (Some municipalities may determine this maximum temperature per code.)
4. Increasing the maximum water temperature may require turning the limit stop screw counterclockwise (see CAUTION above). To verify the temperature of the hot water accurately and safely, place a thermometer in a tumbler of water filled from tub outlet.
5. Once the correct temperature is reached, shut off the valve, then reinstall the dome cover and handle.
If this procedure doesn’t resolve the issue, then there is substantial wear within the valve, and the TA-10 spindle assembly should be replaced. Under certain circumstances, you may need to replace the TA-4 Seats also.
Temptrol Tip:
If you rebuild the valve with a genuine Symmons TA-10 spindle and genuine Symmons TA-4 seats at the same time, you’ll automatically reset the warranty!
How do I disassemble my Temptrol® valve so I can rebuild it?
It’s fairly easy to do, and you’ll only need a few basic hand tools:
– A Phillips-head screwdriver
– A set of hex-head wrenches (sometimes referred to as Allen wrenches)
– A large adjustable wrench or a 15/16ths combination wrench
Now that you have your tools ready, there are a few very important things to know before you start:
1. Turn off the hot and cold water to the shower valve. If your Temptrol valve doesn’t have integral stops (shutoffs built directly into the valve behind the escutcheon/faceplate), you’ll need to find shutoffs on the hot and cold water piping to the valve. In a worst-case scenario, you may need to shut off the main water supply coming into the house.
2. Before you begin any disassembly, the Temptrol valve MUST BE IN THE OPEN POSITION. Turn the valve handle to the ON position and leave it open during disassembly. Attempting to disassemble the Temptrol valve in the closed position could result in irreparable damage to the valve.
Temptrol Exploded View
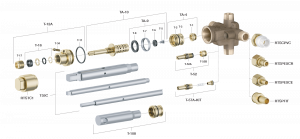
3. Start by removing the valve handle from the control spindle (Part #TA-10®). Depending on the model and year of your valve, the handle could be held onto the spindle by a hex-head set screw in the side of the handle, or by a screw in the center of the handle. You’ll need either a set of hex wrenches (sometimes referred to as Allen wrenches) or a Phillips-head screwdriver.
4. With the handle off, unscrew the dome cover in a counterclockwise direction with your hands.
5. The valve is serviceable at this point, but if you feel the escutcheon/faceplate is in the way, you can remove it. Newer screwless escutcheons clip onto a baseplate with tabs. Push the bottom tab in while pulling the plate off.
On older valves, the escutcheon is typically attached with two visible screws. Remove the screws and the escutcheon, and if the escutcheon includes a white foam gasket, be sure to save that and set it aside for now; you’ll need it during reassembly.
6. With the valve in the OPEN position, use the adjustable wrench or the 15/16ths combination wrench to unscrew the Cap Assembly (Part #T-12A) in a counterclockwise direction. The Cap Assembly and the TA-10 spindle should come out of the valve as one unit.
The Temptrol valve is now ready to be serviced for the Cap Assembly, the TA-10 Spindle, the seats (Part #TA-4) or the various diverters/volume controls found on some models.
Reassembly
To reassemble the valve, follow the instructions in the FAQ titled I’ve repaired my Temptrol valve, now how do I reassemble it?
How do I repair or replace the spindle in my Temptrol® valve?
First, you need to determine what the main issue is before you can move forward:
– If the shower is delivering all cold or all hot water, it’s likely a situation where the pressure-balancing shuttle is being prevented from moving freely, either by debris or corrosion. See the related FAQ to resolve this issue.
– If the shower is dripping, you can simply replace the washers on the spindle. See the related FAQ to replace the washers.
– If the shower continues to drip after replacing the washers, you may need to replace the seats. See the related FAQ to replace the seats.
If none of the issues above apply, and the spindle is damaged or needs to be replaced for preventative maintenance reasons, here are the steps to replace it:
1. Follow the FAQ steps on How do I disassemble my Temptrol® valve so I can rebuild it?
2. With the T-12A Cap Assembly and TA-10® Spindle removed from the valve, hold the cap assembly in one hand and unscrew the spindle counterclockwise from the Cap Assembly.
3. Insert the new TA-10 Spindle into the bottom of the Cap Assembly and screw it in clockwise until the bottom of the cap assembly sits flush against the chrome-plated hot water retainer ring.
There should be no space between the Cap Assembly and the retainer, as shown here:
Reassembly
To reassemble the valve, follow the instructions in the FAQ titled I’ve repaired my Temptrol valve, now how do I reassemble it?
How do I replace the washers on my Temptrol® TA-10® spindle?
To replace the spindle washers, you’ll need a genuine Symmons TA-9 Washer Repair Kit, a pair of adjustable plumbing pliers, and a Phillips-head screwdriver.
Temptrol Exploded View
1. First, follow the FAQ steps on How do I disassemble my Temptrol valve so I can rebuild it? Ensure the water supply is turned off and the valve is in the OPEN position.
2. Once the Cap Assembly and TA-10 spindle has been removed as a unit, temporarily place the handle on it to hold it stationary in your hands.
3. Use a Phillips-head screwdriver to remove the hot washer screw (Part #T-5) and the hot washer (Part #T-6).
4. Using the adjustable pliers, remove the larger cold washer (Part #T-8) by turning the cold washer retainer counterclockwise on (Part #T-7).
5. Install the new hot washer and hot washer screw and tighten with the screwdriver.
6. Install cold washer and cold washer retainer and tighten with the adjustable pliers.
7. Install the fiber Cap Gasket (included with every new TA-9 Washer Repair Kit) onto the bottom of the Cap Assembly.
Reassembly
To reassemble the valve, follow the instructions in the FAQ titled I’ve repaired my Temptrol valve, now how do I reassemble it?
I’ve repaired my Temptrol® valve, now how do I reassemble it?
Great job! Now let’s put it back together. Don’t worry – it’s super easy!
At this point, you probably have the valve body, the TA-10® spindle, and the T-12A Cap Assembly as three separate pieces. Here’s how to reassemble them:
1. Insert the new TA-10 Spindle into the bottom of the Cap Assembly and screw it in clockwise until the bottom of the cap assembly sits flush against the chrome-plated cold water retainer ring.
There should be no space between the Cap Assembly and the retainer, as shown here:
2. Install the fiber Cap Gasket (included with every new TA-10 spindle) onto the bottom of the Cap Assembly.
3. While holding the Cap Gasket in place on the Cap Assembly, carefully thread the Cap Assembly into the Temptrol valve body, making sure the threads mate correctly.
Temptrol Tip:
To start the threads, gently turn the Cap Assembly counterclockwise first until you feel the threads drop together, then thread it in clockwise. It should screw in easily with no resistance. If you feel any resistance, stop, check for any obstructions, and then try again.
4. Snug up the Cap Assembly with a large adjustable wrench or a 15/16ths combination wrench.
5. Place the valve handle on the spindle temporarily and turn clockwise to turn off the valve.
6. Turn the water back on and check for leaks and then check the operation of the valve and spindle.
7. If necessary, set the Temperature Limit Stop. Refer to the FAQ for instructions on how to set the maximum water temperature.
8. Reinstall the valve trim when complete.
I'm ordering a Symmons shower system, and there's a section for Modifications. What are "L Modifiers" and what do they mean?
The “L” modifier options listed for certain shower system products indicate various parts of the system that can be excluded from the standard product. The L is simply an abbreviation for “Less.”
These modifiers are helpful if you want to order something different from the standard system, or if you don’t need certain items.
For example, if you wanted a particular shower system, but wanted a different showerhead instead, you’d order the system with the “L1” modifier, which means the showerhead that is normally shipped with that system would not be included. The price would then change to reflect that excluded part. Then, you’d order the showerhead you want as a separate line item.
For more information, visit our Modified Shower Trims page.
One of the options available when ordering a shower system is "Test Cap Included." What's a test cap and do I need one?
Great question!
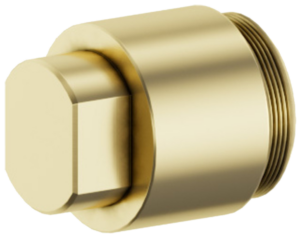
A test cap is a solid brass cap that temporarily takes the place of the TA-10 Spindle and the T-12A Cap Assembly in a Temptrol shower valve during construction or piping system cleaning, like chlorination and/or disinfection.
Here’s what the test cap looks by itself, and when it’s installed in a Temptrol valve body:

How do I register my Symmons product?
How do I determine what parts need to be replaced in my Symmons valve or faucet?
First, find the product type and model number of the product you have. If you’re unsure or unable to find that info, use the Search function on the Installation and Operation Instructions in the Symmons Asset Library.
Once you’ve located the instructions for your product, look at the Parts Breakdown page in the instructions to find the part numbers for the components you need.
Here’s an example of a Parts Breakdown page:

If you need help finding the correct replacement parts for your product, give our Customer Service team a call 1-800-SYMMONS (796-6667) or email us at gethelp@symmons.com.
Pro Tip: Like the old adage, A Picture is Worth a Thousand Words, take a few photos of the product if possible; they’ll help our team to get you the exact parts you need.
How do I order replacement parts for a Symmons product?
To locate a parts distributor near you that carries genuine Symmons Replacement Parts, call 1-800-SYMMONS (796-6667) or email us at gethelp@symmons.com.
Do I have to use Symmons Genuine Replacement Parts?
Yes!
Using inferior generic parts in place of Genuine Symmons Replacement Parts will void the Symmons warranty and could damage the product.
Symmons manufactures every replacement part—whether it’s for a faucet, an anti-scald, pressure-balancing shower valve, or any of our other products—to the same exacting standards in its original equipment. These standards ensure that the repair parts will return the product to its original working condition.
While generic or knockoff parts may appear to be similar to original Symmons parts, they are not machined to the precise tolerances required for the products to function properly, nor are they made of the same high-quality materials as Symmons products.
What's the warranty on Symmons products?
At Symmons, we stand behind all our products with a Limited Lifetime Warranty for residential installations, and a 10-Year Warranty for commercial installations! That’s double the warranty of most other manufacturer’s commercial warranties!
To see our warranty details, visit our Warranty page, and remember our motto: We Make Things Right™.
I need to return a Symmons product. How do I do it?
If you are an end user or consumer and want to return a product that has not been installed, take it back to the original place of purchase with your invoice or receipt. If you are a wholesaler or distributor, contact us at 1-800-SYMMONS (796-6667) or email us for the appropriate Return Material Authorization. If the product is not working properly please contact us at 1-800-SYMMONS (796-6667) or email us at gethelp@symmons.com for assistance.
Heard About Symmons University?
Symmons University offers in-depth, hands-on Symmons product training to plumbing professionals, engineers, designers, distribution partners, and customers.
With brief, detailed videos presented in easy-to-understand language, Symmons University is a great tool to access at any time from anywhere. It includes topics like installation, maintenance, servicing, and more.
Learn More
Need Help Selecting Your Shower?
Our shower configurator walks you through the options to create the shower that’s perfect for your project.
Need Support?
At Symmons, we’re real people behind our name, located right here in North America, and we’re here for you.
Have questions or comments about one of our products? Or maybe you’d like info on where to buy Symmons products near you.
Just submit the form and we’ll get back to you right away.